COLOURED GLASS SPLASHBACKS
Accurate Glass Splashbacks Melbourne » Splashbacks » Coloured Glass Splashbacks
COLOURED GLASS SPLASHBACKS EXPERTS
Coloured Glass Splashbacks are produced by applying a specialised paint coating to the back of toughened glass panels, which are then bonded to the wall substrate with flexible adhesives. All of our splashback installations are fully sealed with quality, mould resistant silicones.
Glass Splashbacks exploit the hard wearing, non-porous and hygienic properties of glass, combining this with a virtually unlimited range of colour possibilities.
Meticulous workmanship and attention to detail has made Accurate Glass Splashbacks Melbourne the first choice for discerning home owners and elite Builders. Reach out to us today to discuss your current or upcoming project.
Accurate Glass & Splashbacks offers splash-backs in industry standard 6mm Grade A Toughened safety glass, with options for:
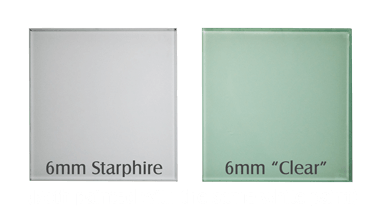
- Standard “clear” float (has a green tinge, but is slightly cheaper)
- Starphire (low iron) - the clearest available glass in the industry, and highly recommended
- Toughened mirror splashbacks in plain, grey (smoked) bronze and antique finishes
- Printed splashbacks - print any digital image, including photographs or patterns

FAQS & TIPS
A trade qualified glazier will manage your project personally. Our splashback design and installation methods have been tested through real application in some of Australia’s most exclusive, architecturally designed private residences and premium construction projects. We can use our expertise to bring this same standard of finish to your home or project.
A sound substrate should be provided to support your glass splashback. Plaster, brick, concrete and timber are all acceptable for direct fixing. Behind a gas cooktop, a continuous backing of non-flammable material such as 10mm plaster or 6mm cement sheet at a minimum 200mm high is required – timber is not acceptable in this location without one of these backing materials behind the glass. The ideal surface for installation of glass splashbacks is a smooth, flat wall. That said, damaged substrates are common in renovations, and we can generally still work with them to achieve good results. Large holes should be patched and loose or torn plaster should be repaired or reinforced. A paint ready finish is not required. Loose material and sharp or lumpy spots should be removed through scraping, sanding or grinding. We can advise you on a case by case basis if further preparation work is required. Final surfaces need to be in place before we can conduct a site measure (see below)
Our paint coating system is specifically designed and warranted by the manufacturer to bond permanently to glass, using a pre-etch process and proven adhesion promoters. We have a wide range of colour samples on glass and can even create or match custom colours on request. Dulux colours may also be specified for the convenience of architects and interior designers. For the owner renovator who may be new to this process, here are a few tips on selecting a colour for your new glass splashback:
- Consider your overall colour scheme & aim for some level of contrast.
- Don’t introduce too many feature colours into your kitchen – two is normally enough.
- Avoid trying to match your splashback to your cupboards or benchtop – they will never quite look the same.
- If you’re planning to sell, choose softer colours that have a wide appeal. If this is your forever home, choose something you love – don’t be swayed by that nosy neighbour!
- Wait until your kitchen has been installed – allowing you to view samples under the usual lighting. We have a virtually unlimited colour range, so there’s no need to commit early in the process.
- Just can’t find the right colour? Our mirror splashbacks create a sense of space and elegance, without introducing more colours. Tinted mirror offers a muted reflection, check out our mirror splashbacks page or contact us for more information.
Once toughened, glass cannot be cut, drilled, ground or modified in any way. If attempted, it will shatter once a small amount of material is removed. As such, installation of all surfaces adjoining the glass splashback need to be fully completed before we can carry out a site measure for your new glass splashback. This typically includes; overhead cabinets and all trim and filler panels, benchtops, window architraves, and in most cases, canopy rangehoods. Note that some rangehoods may obstruct installation of the glass splashback and need to be left out or removed prior to installation. This is common with cupboard mounted rangehoods which project downward from the underside of the overhead cupboard. Contact us if clarification is required. Any holes – e.g. power points and light switches, need to be “roughed in” at a minimum so we can ensure the glass is processed correctly to accommodate these fittings. If glass is required above/behind a canopy rangehood, the unit will need to be fitted and removed prior to site measure. Again, it’s best to contact us to discuss this in advance to ensure the process goes smoothly.
At Accurate Glass Splashbacks, we pride ourselves on our meticulous attention to detail and craftsmanship. That said, the quality of existing work will dictate the level of fit and finish that can be achieved to some extent. With modern machinery, glass can be cut into complex shapes to hide crooked or bowed walls or benchtops. This type of processing increases the cost of manufacturing and also the lead time. Choose all your trades carefully, and the results will be well worth it.

